This is the 15th year of continuous daily publication for 365Caws. All things considered, it's likely it will be the last year as it is becoming increasingly difficult for me to find interesting material. However, I hope that I may have inspired someone to a greater curiosity about the natural world with my natural history posts, or encouraged a novice weaver or needleworker. If so, I've done what I set out to do.
Monday, February 19, 2024
Make Sail, Ye Scurvy Dogs!
Day 129: Although Capt. Morgan Corbye has not been seen for some time, the infamous pirate from a fabulous (in the sense of "fable") world which rather strongly smacks of the Pacific Northwest is still alive and well. Today, her talents were brought to bear in making sail for a loom rather than on a ship. The cloth is cotton duck (a heavy canvas) and this morning, when I had finished making a warp apron for Max, I discovered to my delight that between previous leftovers and a new remnant, I had enough to stitch together so that I could replace the old and rather musty cloth apron as well. I still have to mount them on the loom, but with every passing day, I'm getting closer to anchoring that multicoloured warp and then taking him out for his maiden voyage.
Friday, August 4, 2023
Meet Mrs. Peck
Day 295: Meet Mrs. Peck! That was how she was introduced to me via a YouTube video, although in my care she has undergone a tummy tuck to reduce her avoirdupois. The original pattern for her body consisted of two squares which left her looking quite boxy as a plain cloth prototype, so I trimmed a curve to round her out, "smallerizing" her at the same time. In theory, she's a pincushion, but I couldn't bear the thought of doing chicken voodoo, so she'll just sit on my shelf for now.
If you'd like to make your own Mrs. Peck, you'll need two 6.5" squares of fabric for her body, with one corner rounded off into a nice curve. Her wings shouldn't be too large. Draw a template for them slightly wider at the front and straight across the top edge. Cut them from fabric and sew them to her body parallel to her back seam, then fold them down and topstitch. Cut a 2.25" square for her beak. Fold it into a triangle and then bring the side points together at the lower point to make a square. Fold the beak in half again to make another triangle. It should be open along the lower edge. Cut shapes for her tail, comb and wattle and position them as you like. Sew together along the curved edges and her back, leaving the side opposite her beak open. Now match her back seam to the center bottom seam by pulling out the corners of her bum. Take a few stitches along each side, leaving the center open so you can stuff her tummy. Hand-sew the last short seam and tack on a couple of 1/4"buttons for her eyes. The most time-consuming parts of this cute project are cutting out the pieces and inserting the stuffing, so in a very short period of time, you can make a whole flock to give as gifts.
Saturday, March 4, 2023
Sheeping Bags
Day 142: I've had a couple of requests for a photo of my "sheeping bags," and as you can see, there are several different versions, not only in the colours of the sheep bands, but in the lining as well. As you may also notice if you look closely, I've added my personalized "Made with Love" tags as a finishing touch. Now while I can't claim to have woven the fabrics, almost everything else about these bags is hand-done: the krokbragd bands, the sewing, the knotted cords and the setting of all those dang grommets, of which I only screwed up one out of 64. I managed to remove the bent one without damaging the bag, and reinstalled a new one properly. Actually, I think that was a record for me. As you might guess, I've learned a few things about grommet setting over the years. It has also occurred to me that I have not yet made a sheeping bag for myself. That will be remedied when my current fabric order arrives.
Wednesday, September 18, 2019
Sunflower Season Dresden Plate
Day 340: For some reason, I'm on a quilting jag. I have one row to go on a fully machine-made Cathedral Window before I can start setting cats in the "windows," so in the interest of keeping the spirit alive, I made a sample Dresden Plate block using blue scraps. I was so pleased with the way it turned out that I decided the time had arrived: at long last, I'd sew the orange quilt I've been threatening to make since the 1970s.
Now it has to be said that when I start assembling quilt blocks, I find it much more difficult to keep the placement of the pieces random than setting them in order. Ironically, it is that very randomness that I find most appealing in quilts. I spent a lot of time sick when I was a kid, usually nursing a sore throat and a fever beneath the Double Wedding Ring quilt my great-grandmother made as a wedding gift for my mom and dad. She'd pieced it from cotton flour sacks. I would amuse myself by "walking" the Double Wedding Ring path with my fingers, attempting to find two or more pieces of the same print. Most of the time, it was easy, but there were one or two prints which had only been used for a single wedge. Those were my treasures, those singletons, and by the time I'd recovered from one malaise only to come down with another, I'd have forgotten exactly which ones they were, and the process of finding them could start all over again.
While there won't be any singles in my "Sunflower Season" Dresden Plate quilt, I am still striving for randomness. It's easy to build an ordered universe, not quite so simple to create a chaotic one.
Saturday, August 24, 2019
Kitty Cathedral
Day 315: While nosing around YouTube a few weeks back, I discovered a video which promised a quick and easy way to make a Cathedral Window quilt using a sewing machine for the entire assembly. Having made one small Cathedral Window quilt by hand, I swore I'd never go down that path again; folding cloth origami and getting good meets is not as easy as it sounds. The video showed how to make a single window panel for a pillow and then suggested that multiple squares could be joined to make a full quilt if care was taken in the laying-out process. I thought I could see how it was done, so a few days ago, I dived into the stash of kitty prints I've been accumulating over the years and settled in to cutting squares. They could have been made any size, but I chose to cut them at four inches in order to accommodate the largest of eighteen different prints.
The first single-window block went well, so I made 32 more squares and joined them in two strips of 16 each, the width of my proposed quilt. It wasn't until I had made the third strip that I realized I'd joined Part A to Part C with no regard for Part B (the offset row) in the middle. Out came the seam ripper, and after much bad language, I took another look at the pattern I'd graphed. Oh, yeah...kinda missed that step, didn't I? Setback aside, the squares progressed much more quickly than I'd anticipated, so between yesterday and today, I made three new 16-square strips and joined them in the proper order. The kitty prints shown here are only pinned in place for the photo. They will be stitched in place with the machine when the batting and backing are added, and then an edge binding will be applied and bingo, the quilt will be ready for use!
Friday, March 23, 2018
Monkeyshines
Day 161: I have had a busy morning. Thanks to an internet friend who sent me a pair of "Red Heel" socks, I now have a sock monkey of my very own. I even knit him a little hat just in case it started snowing again while he was posing for his portrait. I can see a few places where I want to improve on the traditional construction. The most major change would be in the length of the white portion of the arms. They seem too long to me, and that's even with shortening them a bit for this version. I would also cut down the toe which forms the dome of his head. It might be fine with a size Large sock, but with the Medium, there's too much crown. The hat conceals it, though.
Saturday, December 30, 2017
Sew Many Things
Day 78: As newly-appointed Kit Mistress for Sound & Fury Morris, my job is to see to it that members are properly outfitted with the custom costume items they can't buy off the shelves. In particular, this means that I need to have on hand baldrics (bandoliers) and armbands for new members. With Wassail coming up on January 6 and three new people in the side, I have been stitching up a storm the last few days! I'm still short a few bits and bobs, notably our signature logo patches which are at the center crosses of the baldrics (front and back), but fortunately Wassail is largely a celebration which takes place in the homes of other Morris dancers. Only one public performance is on the roster, so hopefully the lack of full regalia will be forgiven.
Monday, September 25, 2017
Top Done!
Day 347 (bonus post): The quilt top is done! It measures 70" x 90" (roughly). Now I have to make a judgment call on how to back it. Apparently double-width broadcloth has gone the way of so many good things. I was unable to find it, and since I didn't really want to back the quilt with muslin (natural or white), I bought yardage of the standard 44" width. This means that the backing will have to be pieced, and I need to decide if I want to make squares the same size as the blocks (probably not, because it would make hand-stitching harder where seam allowances stack up), or if I want to use strips or larger rectangles. One side of my head argues that I should just back it with boring old muslin and use the broadcloth for something else. I don't like having seams on the back of a quilt. It's frustrating to be undecided at this point, so close to having it on the hoop and doing the handwork I enjoy most.
Sunday, September 24, 2017
Patience Corner Assembly
Day 346: Assembly of the new quilt is going MUCH faster than expected and in part I will attribute that to using a rotary cutter instead of scissors. The tool allowed much greater accuracy in the cuts and therefore running up seams can be done without a lot of fuss. The design is a simple one as well. Each block can be broken into four smaller blocks consisting of one rectangle and two squares, and with a little planning, these can be sewn together with only one critical meet per pair. The final seam of each block also has only one meet. This morning, I laid the blocks out on the floor to see how I wanted to rotate them (lower left), then stacked them carefully for "batch processing." At the machine, I completed three seven-block strips and joined them in the space of just a few hours, and then decided to call it quits for the day. "Patience Corner" certainly doesn't require a lot of patience to piece!
Saturday, August 19, 2017
Up Next, Patience Corner
Day 310: Inspired by a friend's passion for quilting and her enviable ability to turn them out as easily as she'd make a batch of cookies, I picked up where I left off on the Twenty-Year Quilt about two weeks ago and have been making significant progress on completing it. I don't have far to go with the hand-stitching, and once that's done, I only need to add the edge binding. As I've been working, I've been cogitating (a dangerous activity), and a week ago bought eight prints in lime green, followed a few days later by eight more in purple as well as a couple of others I couldn't resist (the grey cats tangled in the rainbow yarn could go anywhere). The layout of the basic Patience Corner block is shown in the inset, each colour representing a different print. Each block will keep to a colour scheme (lime greens, purples, etc.), and I haven't quite decided if I'll put a border around each one so that the finished quilt is broken up into "streets and alleys" or if I'll just butt blocks up against each other. The white squares in the template will be solid, one coordinated colour per block. I plan to reverse the prints used in rectangles and squares when making a second block so that there will be four or five pairs of identical blocks in each colour palette. At this point, I am not sure how many palettes I will incorporate, but blues will be among them. I'm searching for small-repeat cat and crow prints (crows are very hard to find!); "characters" must fit into a 2 1/2" area. I sewed a test block this morning and was happy to see that they go together easily and logically. Still, the phrase "glutton for punishment" comes to mind!
Tuesday, August 8, 2017
Twenty-Year Quilt
Day 299: I don't recall what year I actually started this quilt. I can only date it by saying that Cocoa (my Cockatoo) liked to use it for a trampoline once it was stretched in the hoop for stitching. That dates it to at least 2001, and since the machine-piecing was done by that point, I'd say we can safely add another two years, maybe even three. Let's make it a nice round number, and call it twenty years ago, ergo the "Twenty-Year Quilt."
I used to call it the "Mistake Quilt." Y'see, all those little squares were supposed to be part of a different top, but somebody (-cough-) forgot to add the seam allowance when she cut them out. In a hasty revision of plan, this version was born. The fact of the matter is that I've made dozens of quilts over the years and have given away all but one which Cocoa also helped create. Every one with the exception of the one I kept have been tied with yarn rather than stitched to hold the batting in place. With its open blocks, this one seemed to beg for hand-stitching even though the quilt itself was pieced on the machine. I can make all sorts of excuses for why it's taken so long to finish: my fingers got sore, I had company over and needed to get the frame out of the way, I got bored...but the truth of the matter is that it brings back memories of Cocoa, and not all of them are things I want to think about. I've worked more diligently at the task over the last several days than during any other time since his passing, but sometimes those dark remembrances still float to the surface while my fingers are busy and my mind is not. It has taken twenty years, but I've taught myself to block their intrusion and wilfully force them back in the box. When I am done (and I truly believe I'll finish it over the next few weeks), the back will bear an embroidered tag with my name and the date, and the words "Cocoa helped." It will no longer be the Mistake Quilt or the Twenty-Year Quilt. It will be Cocoa's Quilt, and thus an heirloom.
Monday, January 2, 2017
The Bat-Bag Project
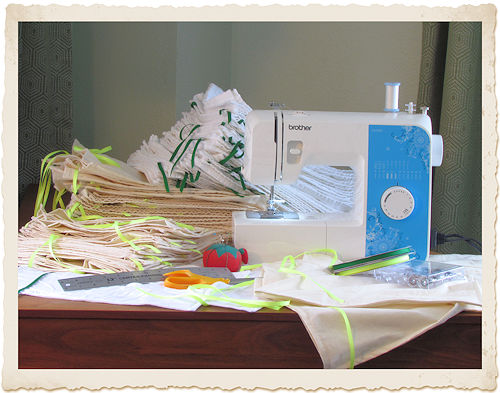
Day 81: When our Park biologist put out a call for volunteers to make 600 bags in which to temporarily hold bats, I conferred with our former campground host and she agreed to provide the materials for 100 bags if I would construct them. Now, 507 bags later, I can say I am officially done with my portion of the project. Those remaining 93 are going to have to come from somewhere else. (The photo shows about a third of the total.)
Why subject the poor bats to being bagged? The biologist will be taking blood samples to test for White-Nose Syndrome, a fungal disease which is devastating bat populations across the country. Although White-Nose exhibits obvious outward symptoms, other diseases manifest in much the same way so that it is impossible to say for sure that a bat is infected just by looking at it, hence the requirement of more elaborate tests. Capturing bats is best done when they are torpid (a state of semi-hibernation), but even when groggy, they respond to intrusion by leaping into flight. The plan is to mist-net them en masse, and then each individual bat will be tucked into a bag and hung up somewhere handy to await testing and subsequent release. The bags cannot be reused without washing between specimens due to risk of cross-contamination, thus the need for so many bags.
What went into the project? Well, here are the final statistics:
156 yards of 36" muslin (100% cotton)
296 yards of grosgrain ribbon for ties
22 250-400 yard spools of thread
125 hours of volunteer labour at the sewing machine
The bags have been washed and are ready for their first use, but I'm thinking that if even the slightest trace of my scent lingers in them, every bat in the Park is going to mark me as a guano target.